


As a newborn photographer since 2017 and a professional editor since 2005, I’ve refined my approach to newborn photo editing to create images families will treasure. The right editing techniques can elevate your photographs from beautiful captures to heirloom-quality portraits while preserving that natural, delicate look that defines exceptional newborn photography.
Today, I’m sharing the five essential newborn photo editing techniques that should be part of every image you deliver to clients.

Perfect Skin Tones: The Foundation of Beautiful Newborn Photos
Achieving accurate and flattering skin tones is essential for professional-quality newborn images. Newborns often have color challenges that need careful adjustment:
- Jaundice (yellowish tint)
- Overall redness or pinkness
- Uneven coloration
- Red hands and feet
Pro Tip: Create a custom white balance for each session to give yourself a strong foundation. When editing, pay special attention to the red, magenta, and yellow channels. For newborns, I often add a little red and yellow and reduce magenta to create that perfect baby-soft tone. As a general rule of thumb, it’s always better for babies to look slightly warm than too cool. Warm skin = healthy and alive, blue skin = well… nothing we want for a baby.
Use localized adjustments to fix areas where feet or hands might show color variations. Focus on creating natural, consistent color throughout the image while still preserving the unique qualities of your subject’s skin.
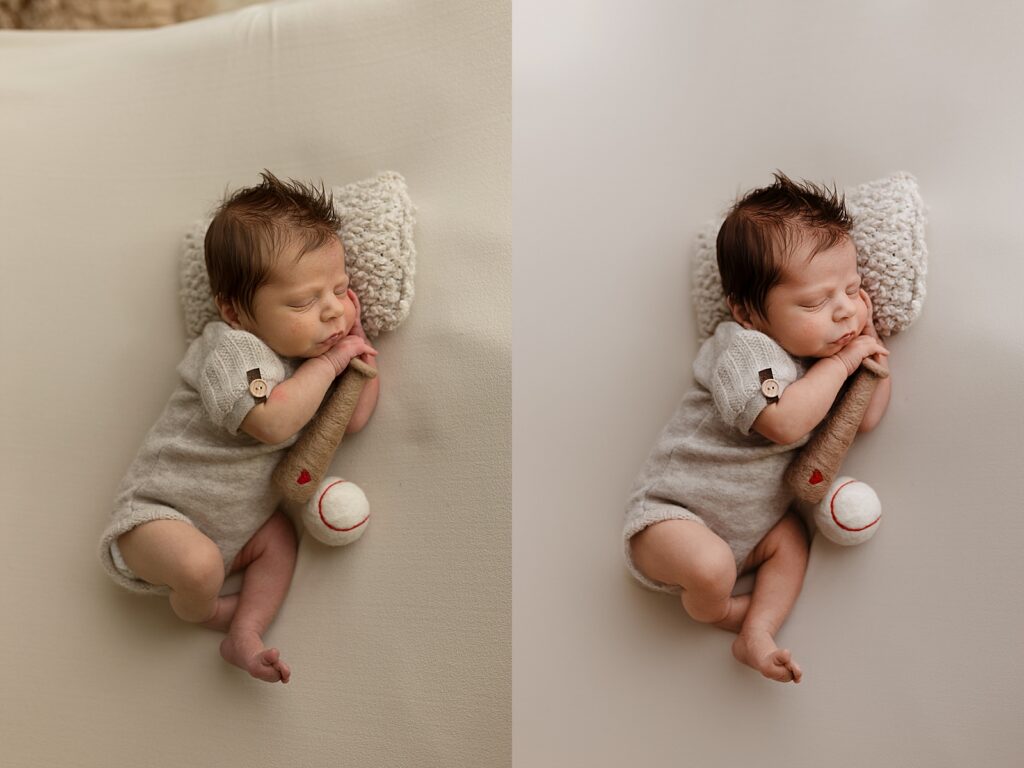
Left: Before image, his leg is dark purple/red and his hands are red and blotchy, his cheeks have a slightly jaundiced look. The Right is the after where these things have been edited using local adjustments to bring all the tones closer together.
Gentle Skin Retouching That Preserves Natural Texture
Most newborns arrive with temporary skin texture issues – it’s completely normal! While these will naturally resolve in a week or two, parents will appreciate these conditions being minimized in their forever photos:
- Baby acne
- Flaky or peeling skin
- Dry patches
- Tiny scratches from their fingernails
Pro Tip: Always preserve anything that is normal and permanent for that baby, like birthmarks or stork bites – these are features parents will want to remember. I soften the milia (those tiny white spots) on their nose but don’t remove it entirely. I always tell my clients, “I want your baby to look like YOUR baby, just on their absolute best skin day.”
Background Cleanup for Distraction-Free Images
Nothing pulls attention away from a beautiful newborn portrait faster than stray blanket wrinkles, lint, or other background elements competing for attention.
Pro Tip: For fabric backgrounds, clean up major wrinkles and lint but leave some texture to keep the organic feel of the material. Don’t forget to remove environmental distractions like vents in the floor or electrical outlets on walls – these details can be easy to miss during shooting but become glaring in the final image. I absolutely love Photoshop’s new generative AI and content aware fill to quickly and easily remove distracting items.
Composition Refinement and Thoughtful Cropping
Even with careful in-camera composition, most images benefit from subtle refinement during the editing process. With a lifestyle background, look for straight lines on windows and horizons
Pro Tip: Take time to evaluate each image’s composition. Make thoughtful crops that draw attention to your subject while maintaining proper proportions. For newborns, I typically ensure there’s enough space around their tiny features while avoiding awkward crops at joints or extremities. Sometimes a slight rotation adjustment can make all the difference in bringing an image (or pose) to life.


Color Harmony and Gallery Consistency
Creating a cohesive look across your entire gallery elevates your brand and helps attract those dream clients willing to invest in your art.
Pro Tip: Develop a signature color palette that works for your style. There’s no right or wrong here, this is color grading. Whether you prefer warm, creamy tones or cool, bright images, consistency is key. I maintain a collection of custom presets that I’ve developed over years of newborn photo editing, which I use as starting points for maintaining my signature look. I also will routinely open a composite image such as the one below to make sure my edits match my preferred look and maintain that consistency.


Top: Glean & Co’s typical edit Middle: Cool and contrasty Bottom: Warm. The differences are subtle but make a big difference when you look at your body of work as a whole! Most really incredible photographers have a style that stands out from the crowd and is distinctively recognizable.
Master Your Newborn Photo Editing Skills
These five editing fundamentals are just the beginning of what makes newborn photography stand out in today’s market. By mastering these techniques, you’ll consistently deliver beautiful images that parents will treasure—and that will naturally elevate your brand.
Ready to take your newborn editing skills to the next level? Join our Newborn Editing Academy where you’ll learn all these techniques and much more. From advanced skin retouching to creating your signature style, we’ll help you master the art of newborn photo editing.
Follow along on Instagram to learn more newborn photo editing techniques, tips and tricks!
Paige McLeod is the owner and lead newborn photographer at Glean & Co Photography in Boise, Idaho as well as a 20 year editing veteran. She honed her skills working in Los Angeles and Seattle with magazines like Entertainment Weekly and major companies like Nordstrom. In the past 9 years she has been working exclusively on newborn photo editing techniques, teaching other newborn photographers as well as on her own craft.


LEAVE A COMMENT
Comments